Quick Sweater

Bulky yarns are fun. I needed a quick project. I made a sweater for my niece using Bernat Blanket Yarn in Vintage White.

Below is the reason I had to take the photo outside. 


Toddler Sweater & Eclipse

I knitted a long toddler sweater. She can use it as a dress if she wants. 

 I knitted the front, back, and arms separately. I finished off the neck & cuff with a crochet shell stitch. 


 We had thunderstorms today. Then the clouds stuck around and we didn't get to see much of the eclipse. The sky was dark enough that some of the street lights came on, but that might be due to the clouds and not the eclipse. If you look closely, you can see the moon on the far right creating a bit of a crescent. 


This image shows more of the clouds. That was all I got to see of the eclipse between the storm and cloud cover. Better luck next time on April 8, 2024 according to CNN

Tropical Poke Cake


This can be made in a 9 X 13 cake pan. I like to bake cakes in canning jars (never can baker products) for convenience.


Ingredients:
1 box of yellow cake mix
              Eggs & Oil per directions for mixing cake
1 can of crushed pineapple
Juice of 3 lemons
1 large box of instant banana pudding
              Milk per directions
2 drained cans of mandarin oranges
1 tub of Cool Whip
*Optional: 1 cup of shredded coconut

Instructions:

Prepare cake as directed on box. Add crushed pineapple and mix until thoroughly combined. Bake until inserted toothpick comes out dry.

While warm, poke holes in cake with handle of wooden spoon. Poor on lemon juice. Allow to cool.

Mix banana pudding and before it sets, poor it over the cake allowing it to flow into the holes. Arrange mandarin oranges on top. Spread Cool Whip over the top of oranges and cake. Sprinkle shredded coconut over Cool Whip.

Serve. Needs refrigeration.
The photo shows a plastic cup with the poke cake. I filled the jars too full and had to scoop some of the cake out. I added the ingredients in the plastic cups to finish making them.


Basket liner


This is my new basket liner for my sewing supplies. My previous one wore out. It can be seen here: Basket Liner with Pockets 

My previous liner had flat pockets and I decided that I wanted the new pockets to have more space and I added an inch to each pocket. To protect my pockets from sharp scissors, stylus, pens, or pencils, I use empty prescription bottles to prevent damage to the fabric.


Our dogs love the camera. Whenever I point my camera at something, they have to get in the picture. Of course, I have to take their photos.  The top photo of the basket shows their paws as I zoomed in.


Covered photo album

I made our niece a covered photo album. She isn't into flowers and lace, so I made this with few decorations.


I sewed little belt loops on the cover to insert a gold cord. I hot glued the cord in a few places to help it stay secure. This still looks plain. I used metallic fabric paint to put her name on the front. Her first name is painted above the cord and her last name is painted below the cord. I didn't want to give out her name so I didn't include that photo on here.


I sewed pockets in the back to hold memory cards. It looks like nine pockets, but it is only six. The middle strip is a fold over cover to help keep the memory cards from falling out.

Egg Rolls


Ingredients:

Filling
1 pound of ground beef
1 pound of coleslaw mix with carrots
1 medium onion chopped
1 tsp garlic powder
1 TBS soy sauce
1 tsp Worcestershire sauce
  
Egg Wash
1 egg mixed with 1 TBS of liquid (I used cream)
 
1 package of egg roll wraps*

Brown the ground beef and chopped onion. In large bowl, combine all ingredients for the filling. (Do not add the egg wash mixture.) Mix thoroughly. 

Position egg roll wrap on point (points facing up, down, and to the sides). Place 2 or 3 TBS of filling in the center of the wrap. Coat all edges with the egg wash. Fold bottom point up and over the filling. Then fold sides in and press edges to seal. If using 2 or 3 TBS, fold top point over and seal edges. Should look like an envelope as in the photo above. If using 1 TBS, roll the wrap up and press the edges to seal.  Should be a narrow roll. 

Fry until golden brown. Place on cooling racks or on paper towels. Serve immediately or freeze in wax paper & aluminum foil/freezer bags. 

* 2 or 3 packages if you use 1 TBS of filling instead of 2 or 3 as I do.  

Mosaic Baby Quilt

 This is my first mosaic quilt. This is on one side of a baby quilt.
 The image of our friend's toddler is easier to see when the image is small or the quilt is farther away. 


Up close, the mosaic looks like a jumble of small blocks and the face if harder to see. 


The other side of the mosaic quilt has three butterflies and a caterpillar. 


The purple border around the butterflies has heart stitches.  


 The wings of each butterfly have a different designer stitch. This is one is a vine with leaves. The butterfly heads and bodies are trapunto. 


 This butterfly has bows on its wings. 


 This butterfly has arrows. 


Red & Gold Candle Mat

Today, I finished the red & gold candle mat. 

Here is the video tutorial: Video 

Folded Candle Mat

I made a folded candle mat. I plan to make another one that red and gold. I'll post when it's completed. 

I found the tutorial --> Folded Candle Mat Tutorial


Mosaic Quilt

This is my mozaic quilt so far. I'm in the process of sewing each row and column. 

This is how I made my pattern. I printed a black and white photo onto lined graph paper. Then I made a cheat sheet of my fabric in black and white as well. Then I matched the fabric shades to the photo shade. The part that I wasn't happy about was the chin area. There appears to be too much light coloring. In the future, I'll have to watch for such a problem to avoid it. I'll doctor it up a bit with slightly darker shades to create more dimension in the mozaic. 

When I matched the fabric to the photo, I wrote down the letter or number that corresponded with the square on the photo. I wrote letters and numbers on the organizer. I kept the fabric squares in a bead/jewelry organizer. 

More to come later. 


Sewing hacks

Here are some of my favorite sewing hacks and tips. 
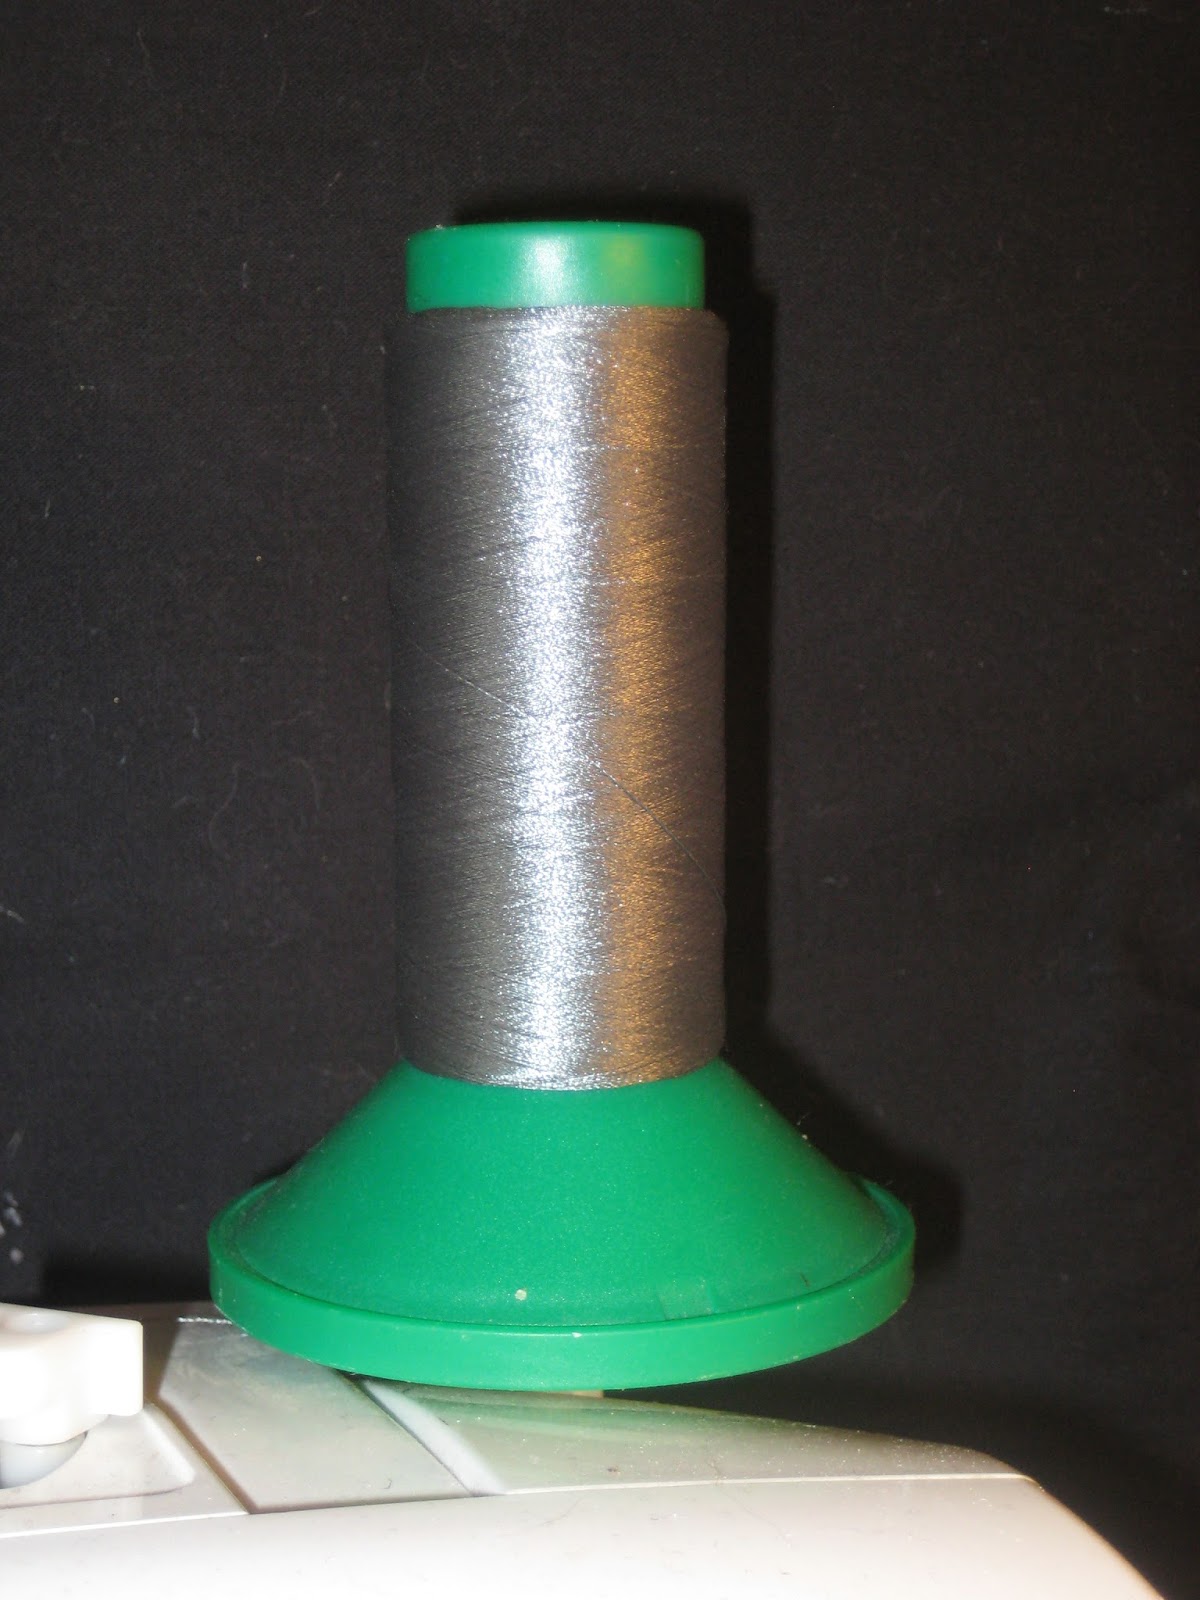
 This is the spare spool holder on my machine. I place a large cap on the bottom and then one of the smaller ones near the top. 

 Then I can use it for a spool that is too large for the regular horizontal spool holder. The bottom cap is where the spool rests. The smaller cap prevents the spool from wobbling. 

Sometimes, I forget to remove a pin and then hit it with my needle. If I pin my projects parallel to the foot, then I don't need to worry about removing them because the pins don't get near the needle and I never hit the pins. 

Pumpkin Carving

 I carved pumpkins again this year. I used a Drummel tool with the carving bits to do my pumpkins. 

 This one is supposed to be a dog. I traced a photo of one of our dogs, but I had trouble. The tracings either looked like a teddy bear or a pig. I tried several times and then decided this would have to do. 

 I found this pattern on Pinterest. After I finished carving it, I dropped the pumpkin and the mouth area fell off. I had to fix it with toothpicks. You can see one of the toothpicks if you look closely. 

 I used a photo of one of our cats to make this template. This is my favorite pumpkin this year. 

 This is the photo that I traced of our cat, Mystique. Not all her tabby coat markings are on the traced paper, but this gave me a good starting point. 

 This is the cat template. I used an Exacto knife and cut out the carving areas. Sewing pins tacked the paper onto the pumpkin and I marked the lines with a red Sharpie fine point marker. Notice that not all my lines meet. 

 Last year, my hands were sore trying to scrape out the pumpkins so that the Drummel tool could cut deep enough for the light to show through. This year, I ordered this from Amazon. It was much easier and a lot quicker to scrape down the pumpkins. 

Gift for Niece

 This is a fleece blanket for my niece's birthday. She wanted zombies. I used a tutorial from the internet making scalloped edges, faux braids. When I took a close up image of the braid, the details got lost in the colors. 

It is supposed to be a no-sew pattern, but I used a walking foot and a zigzag stitch to secure the edge of the blanket about half an inch from where the braids start. 

 My niece's birthday is in December and this is now ready. 

Butterfly Quit progress

Here is the progress of the butterfly quilt. I still need to add a border before I work on the back. 

Butterfly Block

This is my butterfly block. It is applique. The head and body are trapunto. I hand stitched the head and body onto the green butterfly fabric. I used a simple chain stitch to connect the antenna tips to the head. I used the sewing machine with a zig-zag stitch to sew on the wings. I need a total of 3 butterfly blocks and I think I'm going to use a different stitch for each block. I haven't decided if I'm going to use white thread and give the butterfly a smiling face.  

Wedding Star Project

Update: I have added the paper piecing pattern for two sizes. The 6 inch block pattern will require four to make a finished 12 inch wedding star block. The 8 inch block pattern will require four to make a 16 inch wedding star block. 

To print the patterns, place mouse over the image, right click and pick "copy image". Paste image in a word document or any other program that offers printing. You may have to adjust to get the gauge to match the actual measurement.


This is the 6 inch pattern, page 1 of 2. I placed a measuring gauge on the page to help with accuracy. Print 4 for each block. 


 This is the 6 inch pattern, page 2 of 2. I placed a measuring gauge on the page to help with accuracy. Print 4 for each block. 


This is the 8 inch pattern, page 1 of 4.  Gauge included for accuracy. Print 4 for each block. 


 This is the 8 inch pattern, page 2 of 4.  Gauge included for accuracy. Print 4 for each block. 


 This is the 8 inch pattern, page 3 of 4.  Gauge included for accuracy. Print 4 for each block. 


This is the 8 inch pattern, page 4 of 4.  Gauge included for accuracy. Print 4 for each block. 


*** end of update, original blog below***


I have seen some wonderful wedding star projects. I haven't had the time to do one, yet, but I hope to do so soon. I did figure out how to make the pattern for it, though.

I plan to use four of the paper pieced sections (8X8 inches) above to create a full block.


 This is a version of a dark background quilt. 


This is a version of a light background quilt. I plan to make my quilts bigger than four full stars. My quilts will have eight to ten full stars wide by eight to ten full stars tall. 

My First Chili Recipe

Ingredients:
2 pounds ground beef
3 cans of Bush's Best Chili Beans in mild sauce
2 (28 ounces) cans diced tomatoes with juice
1 (6 ounces) tomato paste
1 large onion
3 stalks celery, chopped
1 red bell pepper, seeded and chopped
1/4 cup chili powder
1 Tbs Worcestershire sauce
1 Tbs minced garlic
1 Tbs dried oregano
2 tsp ground cumin
1 tsp dried basil
1 tsp salt
1 tsp ground black pepper
1 tsp paprika
1 tsp brown sugar
Optional: Shredded cheese & crackers

Brown the beef in a skillet. Drain grease. Combine all ingredients in a large pot. Heat until boiling. Lower heat to simmer. Simmer 2 hours to allow flavors to mix.

This can be made in a crock pot. Cook until ground beef is browned, 4 to 6 hours.


Burp Cloth Project

I made some burp cloths using some fun fabrics with fairies.


 I didn't cut them apart for any quilt block design because I liked the fabrics so much just as they were. 


This is a pink fabric with fairies. Both will be used in a future quilt.


I sewed the fabric, right side against the cotton diaper, on all sides leaving a 4 inch gap to invert the burp cloth so the right side was then out. I clipped the corners to reduce a little of the bulk. 

After turning the fabric right side out, I used a zipper foot and sewed along the "bump" that the two fabrics created with the extra layers along the outer edge. 


Finally, I hand sewed the opening closed.


I had two different sets. I made three of each.