Another post on my husband's Star Wars Quilt

First, I have to admit that this may be a little hard to view. I placed the pieced part on top of another quilt and didn't realize how distracting that was. The above photo has some larger squares of the Star Wars fabric pieced together. 


The is the back side of the section that I currently have finished. These are the modified disappearing nine patch blocks. I used the quilt-as-you-go method. These have sixteen blocks pieced together. I'm far from finished and I will put some updates as I go.

My husband's Star Wars Quilt


This quilt has a form of a disappearing nine patch. I started with big blocks of 13 inches. I put the nine blocks together and cut them into four sections, horizontally and vertically. Then I cut each of those sections into four, horizontal and vertical, and sewed them up to make quite the chaotic patchwork. 


Then it was suggested that I try a diagonal cut on the disappearing nine patch. So after the initial horizontal and vertical cut, I cut the square diagonally. It really gave the blocks a different look. 

I'll post more about the quilt as I complete it. 

Post-It Pad Covers Tutorial


This is a tutorial for the 3 inch square Post-It Notes.


Materials needed:
Stiff fusible measuring 3 ½ inches by 8 inches.
Outside fabric measuring 4 inches by 8 ½ inches.
Inside fabric measuring 4 inches by 8 ½ inches.
Pocket fabric measuring at 3 inches by 4 inches.


Use the 3 inch Post-It to mark where it will sit on the stiff fusible by drawing lines at each end of the Post-it. Then turn the Post-it and mark the thickness for each end. Press and fold on the lines. There should be four lines. I used blue ink so you could see the lines, you may wish to use a lighter color.


Mark the inside fabric as you did the stiff fusible. Use the Post-It to mark where it will sit and mark it the way you did the stiff fusible. Fold on the lines. Use a marking pen or marking chalk that will disappear easily.


Here is the fabric that will make the inside pocket to hold the Post-It. I wrote the 3 inches and direction arrows in ink for the tutorial. Don’t do this or you may see the ink marks after the cover is finished.


Mark a ¼ inch mark at the top of the pocket liner.


Fold to the wrong side of the fabric and press. Sew in place.


Place the pocket across the bottom line of where the Post-It will sit. Put the fabric right sides together and have the pocket facing downward. You will fold it up to create the pocket. Sew in place 1/8 to ¼ of an inch from the bottom edge of the pocket piece. (Hope that didn’t sound confusing. Perhaps the photo will clear it up.)


After sewing, fold up so the right side is facing up. Press. Next, you will align this up on the stiff fusible.


Secure the inside piece onto the stiff fusible per instructions. I fold like I am wrapping a present.


I use bamboo skewers to hold the fabric near the hot iron to prevent burning my fingers.


After the inside fabric is attached to the stiff fusible, the pocket piece will still be loose. I glue baste the pocket into place. You can pin it or secure it any way that you wish.


Place the outside piece onto the fusible and secure per the directions of the fusible. Ensure that the edges are folded under to create a finished edge. Sew 1/8 to ¼ of an inch from the edge on all sides to secure the top and bottom fabric pieces, including the pocket.


The first one that I made, I made a mistake and had to trim the back flap of the Post-It pad to make it fit the cover. The others were fine.
Slip the pad in place and you have a Post-It cover. The one above closes with Velcro. I didn’t take photos of this, but I did of a later one.

I have included some alternative ideas in the following photos.


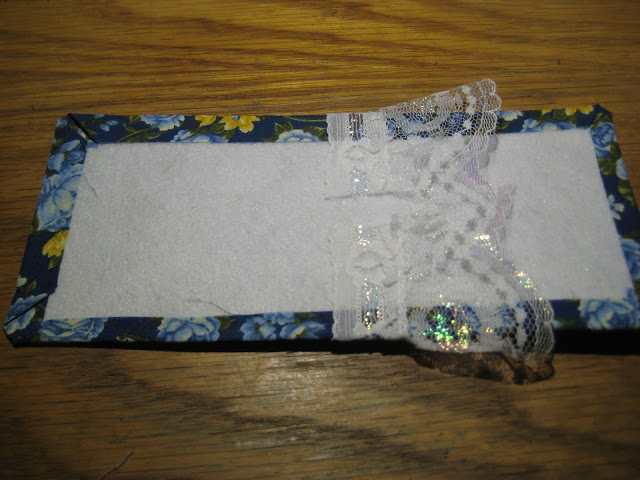
For one, I used a piece of lace to keep the pad in place. I didn’t sew a pocket, but secured the lace in the same spot the pocket would have been. This is the image from the back before the top is in place.


Here is how it looks from the other side. A ribbon, eyelet, or other straight piece of fabric could also work to hold the pad in place.


Here is the pad sitting in the lace. I gave this to my friend.


Instead of Velcro, I used a small hair tie and button to close this cover.


I used chalk to mark the thickness of the pad.


Instead of just folding, I sewed along the fold lines. You may like this result better than just folding.


Here is an image of the Velcro. I placed it about ½ inch from the fold lines on the inside. Then I added the other Velcro on the other end on the outside. That way, when it folded, the Velcro strips lined up and could be pressed closed.


Now, you have a Post-It pad cover. These can be made for any occasion depending on the fabric used.

You can make these as party favors or thank yous. If you use white or a cream satin, it can be used as gifts for bridesmaids. If you use baby themed fabric, they can be used for a mother-to-be or as thank yous for a baby shower. With a little embellishment or embroidery, these can be made for Mother’s or Father’s Day.

Think of other holidays, heart fabric can me these cute ideas for Valentine’s Day. Christmas Fabric can make these cute stocking stuffers. 

Individual Serving Tea Bags and Coffee Bags Tutorial


This tutorial will show how to make your own single serve tea bags and coffee bags from loose leaf teas and ground coffee.

There are two different ways to make the bags. The one of the left, uses a quarter of a coffee filter. The one of the right basically uses one whole filter. The idea behind the one on the right is to utilize as much water flow as possible for the tea or coffee.

The first part of the tutorial will show how to make the bag on the left. The last part of the tutorial will show how to make the bag on the right.


Start with ¼ of a coffee filter.


Fold in half.


Sew the sides together. Remember to back stitch at the beginning and the end or your leaves and grounds may work their way out.


Trim off excess thread. Fill with your coffee or tea. Fold the top corners down.


Fold the remaining top down about ¼ of an inch. Then fold again.


Sew the top in place remembering to back stitch at the beginning and the end. Do NOT cut the string. It will be used to connect the paper so you know what is in the bag.


Pull the string about three inches. Do NOT cut. Place a square of paper under the presser foot. Zig Zag so the paper is now attached to the bag. I do not back stitch the label paper. There isn’t a lot of stress on it and if it falls off after the bag is in my cup, I already know what was on it.


Now cut the thread and write the contents of the bag on the square of paper.


For the rectangular bags, sew a tube by folding the filter in half and sewing a straight line about two inches from the fold.


Trim off the excess paper filter.


You should have something that looks like the photo above.


Roll the paper so the seam is on the top and fold to flatten.


Fold in half so the seam is on the outside.


About half an inch on both sides of the fold, fold the filter back over the seam. You should now have the seams on the inside facing each other. This will allow the water to flow better and allow your tea leaves to expand for better infusion.


Fill one side of the bag with tea or coffee. You can fill both sides if you want a stronger brew which means double the amount of tea or coffee that you add.


Fold the top (open end of the tea bag) corners down like in the photo.


Fold the remaining straight top edge down so it meets the bottom of the triangle folds.


Fold the whole section over again.


Sew the top in place. Remember to back stitch at the beginning and the end. Do NOT cut, yet. Pull the bag so that it is about three inches from the sewing foot. Sew a piece paper under the foot so that it is now connected to the tea bag.


You should have something that looks like the above photo. Trim off any excess threads. I tend to do this on the bag, but not the paper. Write the contents of the bag on the paper. 


This is what your finished tea bag should look like.

You can use any coffee filter that you would like. So spend as much as you would like or be as thrifty as you want. 

Paper Cup Cozy Tutorial


This tutorial is for a 16 oz Dixie paper cup, but this can be used for any paper cup.


Carefully cut open the paper cup and remove the bottom. This will be your template.


Use the paper cup template on the wrong side of the fabric. I found it easier to draw around the template, but if you prefer to pin the template to the fabric, then do so. Use whichever method is easier for you.


Use the template to:
Cut 1 piece from the fabric for the outside (add seam allowance).
Cut 1 piece from the fabric for the inside lining (add seam allowance).
Cut 1 piece of batting (do not add seam allowance to reduce bulk).


Lay the batting on the wrong side of the outside fabric. Position so it is centered on the fabric.


Pin or glue baste in place.


Quilt the batting in place. The more quilting that you do, the stiffer the piece will be.


Now lay the quilted outside piece onto the inner lining, right sides together.


Stitch the top and bottom of the wrap using the batting as a guide. If you did not include a seam allowance on the batting, then it will be the size of the paper cup.


Trim away excess fabric to reduce bulk.


Turn the tube inside out. Align the open ends with the right side out (we are creating a French seam so there are no raw edges when finished).


Stitch together and trim close to the stitching line. Then turn so the wrong side is out and sew the seam again. This hides the raw edge. Then turn so the right side is out again.


You should have a finished paper cup holder to prevent your hands from burning and to help keep your drink warm longer.